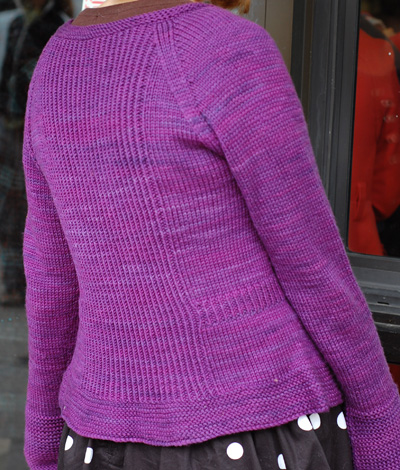
LOWER BODY
Using larger circular needle, CO 161[181, 201, 221, 241, 261, 281] sts. Do not join.
Work in garter stitch until work measures 2[2, 2, 2, 2, 2.5, 2.5] inches. Set Up Body Pattern:
Using smaller circular needle, continue as follows: Set-up Row [RS]: K15[17, 19, 21, 23, 24, 25], place marker, work next 15[17, 17, 19, 21, 23, 25] sts in 1x1 Twisted Rib, place marker, k12[13, 16, 17, 18, 20, 22], place marker, k19[22, 24, 26, 29, 32, 34], place marker, work next 39[43, 49, 55, 59, 63, 69] sts in 1x1 Twisted Rib, place marker, k19[22, 24, 26, 29, 32, 34], place marker, k12[13, 16, 17, 18, 20, 22], place marker, work next 15[17, 17, 19, 21, 23, 25] sts in 1x1 Twisted Rib, place marker, k15[17, 19, 21, 23, 24, 25]. Next Row [WS]: K4, p to first marker, work in 1x1 Twisted Rib to second marker, p to fourth marker, work in 1x1 Twisted Rib to fifth marker, p to seventh marker, work in 1x1 Twisted Rib to eighth marker, p to last 4 sts, k4.
These 2 rows establish Body Pattern: first and last 4 sts of each row are worked in garter st, 1x1 Twisted Rib is worked over sts between first and second markers, between fourth and fifth markers, and between seventh and eighth markers. All other sts are worked in stockinette st. Third and sixth markers indicate placement of side “seams”. Continue in pattern until work measures 4.75[5, 5.25, 5.5, 5.75, 6, 6.5] inches, ending with a WS row. Waistband:
Row 1 [RS]: K to first marker, work in 1x1 Twisted Rib to eighth marker, k to end; at the same time, X[X, p2tog, X, X, X, p2tog] at each side marker (where X means don’t do anything).
Row 2 [WS]: K4, p to first marker, work in 1x1 Twisted Rib to eighth marker, p to last 4 sts, k4.
Repeat these 2 rows 3[3, 3, 3, 3, 5, 5] times more, then resume working in Body Pattern.
Continue in Body Pattern until work measures 10[11, 11.5, 12, 12.5, 12.5, 13, 13] inches, ending with a WS row. Note: Read ahead! Buttonholes are worked at same time as yoke shaping. Place Buttonholes:
Next Row [RS]: K2, yo, ssk, work in pattern as set to end.
Repeat this row every tenth row until sweater is complete (throughout remainder of lower body, as well as during yoke shaping). Continue in Body Pattern until work measures 12.5[13, 13.5, 13.5, 14, 14.5, 15] inches, ending with a WS row. Set lower body aside and work sleeves. Do not break yarn; begin first sleeve with a new ball of yarn. SLEEVES (Make 2)
Using larger double-point needles, CO 41[43, 45, 49, 49, 51, 51] sts. Join to begin working in the round, being careful not to twist. If desired, after several rounds have been worked, place safety pin or split ring marker in work to indicate beginning of round.
Work in garter stitch until work measures 5 inches. Switch to smaller double-point needles and k 5 rounds. Increase Round: K1, m1, k to last st, m1, k1.
K 5[5, 5, 5, 5, 5, 4] rounds.
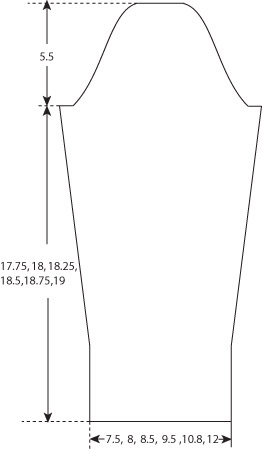
Repeat these 6[6, 6, 6, 6, 6, 5] rounds 11[11, 12, 11, 12, 11, 14] times more. 65[67, 71, 73, 75, 75, 81] sts. Continue in pattern until work measures 17[17.5, 18, 18.5, 18.5, 18.5, 19] inches or desired length to underarm. Next Round: K3[3, 3, 4, 4, 4, 5]. Place last 6[6, 6, 8, 8, 8, 10] sts worked on hold on waste yarn. Slip remaining 59[61, 65, 65, 67, 67, 71] sts to spare double-point needles. Break yarn, leaving a tail approx. 12 inches long. Work second sleeve in the same way, but do not place sts on spare needles after slipping sts to waste yarn.
YOKE
Using smaller circular needle and ball of yarn attached to lower body, join sleeves to body as follows. Remove side “seam” markers when placing sts on hold.
Joining Row [RS]: Work in lower body pattern to 3[3, 3, 4, 4, 4, 5] sts before third (side seam) marker, place raglan marker, place next 6[6, 6, 8, 8, 8, 10] sts on hold on waste yarn; k all sts of one sleeve, place raglan marker; work lower body in pattern to 3[3, 3, 4, 4, 4, 5] sts before next side seam marker (formerly sixth marker), place raglan marker, place next 6[6, 6, 8, 8, 8, 10] sts on hold on waste yarn; k all sts of remaining sleeve, place raglan marker; k to end of lower body. 267[291, 319, 335, 359, 379, 403] sts: 39[44, 49, 53, 58, 63, 67] sts for each front, 59[61, 65, 65, 67, 67, 71] sts for each sleeve, 71[81, 91, 99, 109, 119, 127] sts for back. Mark beginning of this row using safety pin or split ring marker (for ease in measuring for neckline placement). Work 1 WS row in pattern as set. While working yoke, maintain 1x1 Twisted Rib panels as set, and continue to work first and last 4 sts of each row in garter st, working buttonholes every 10 rows as established. All other sts are worked in stockinette st. Note: Read ahead! Raglan shaping and neckline shaping are worked at the same time.
As you work raglan and neckline shaping, shaping will eventually encroach on 1x1 Twisted Rib panels. When this happens, work raglan shaping sts in stockinette st. Work 2 sts at each neckline edge in stockinette st.
Raglan Decrease Row [RS]: [Work in pattern to 3 sts before raglan marker, k2tog, k1, slip marker, k1, ssk] 4 times, work in pattern to end. 8 sts decreased.
Work 1 row in pattern.
Repeat these 2 rows 18[20, 22, 22, 22, 24, 28] times more. AT THE SAME TIME, when work measures 3[3.5, 3.5, 3.5, 4, 4, 5] inches from Joining Row, ending with a WS row, shape neckline as follows: BO 9[11, 11, 14, 16, 16, 16] sts at beginning of next 2 rows.
BO 3[3, 4, 4, 7, 7, 7] sts at beginning of following 2 rows.
BO 2[2, 4, 5, 5, 6, 6] sts at beginning of following 2 rows. Neckline Decrease Row [RS]: K1, ssk; working raglan decreases as set, work in pattern to last 3 sts, k2tog, k1.
Work 1 row in pattern.
Repeat these 2 rows 2[3, 3, 3, 3, 5, 5] times more. Neckline decreases are complete; work front edge straight until raglan decreases are complete. When all decreases are complete, 81[83, 89, 97, 111, 109, 101] sts remain: 3 sts for each front, 21[19, 19, 19, 21, 17, 13] sts for each sleeve, 33[39, 45, 53, 63, 69, 69] sts for back. BO all sts. |
Using smaller circular needle and beginning at right front edge, pick up and k 1 st in each bound-off st and 3 sts for every 4 rows along right front neckline edge; 3 sts for every 4 sts along top of right sleeve, back neckline and left sleeve; 3 sts for every 4 rows and 1 st in each bound-off st along left front neckline edge.
Rows 1-4: K all sts.
Row 5 [WS]: K1, k2tog, k to last 3 sts, k2tog, k1.
Row 6 [RS]: Work as for Row 5.
Row 7 [RS]: K1, k2tog, draw first st on right needle over next st to bind off; BO all sts until 3 sts remain on left needle, k2tog and bind this st off, BO remaining st. Graft held sts of body to held sleeve sts at underarms.
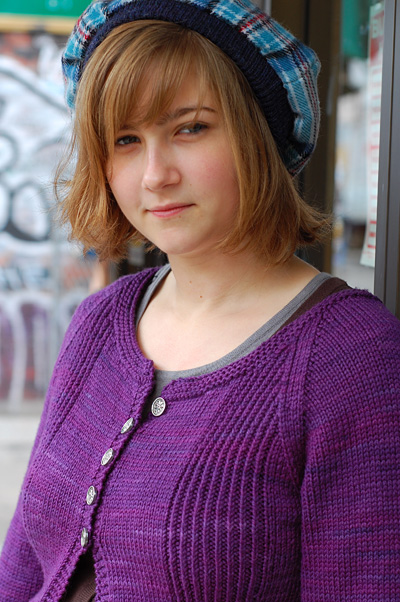
Weave in ends and block as desired. Sew buttons to left front edge, opposite buttonholes. 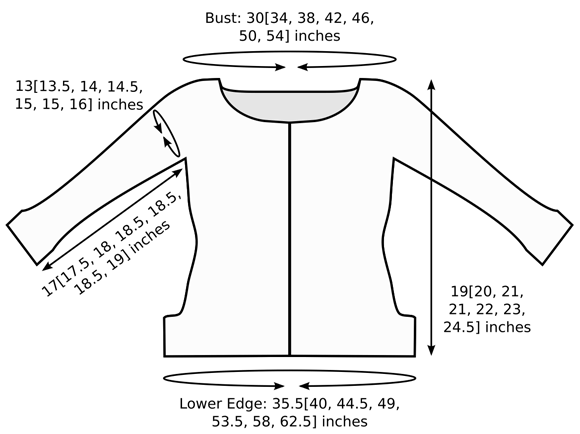
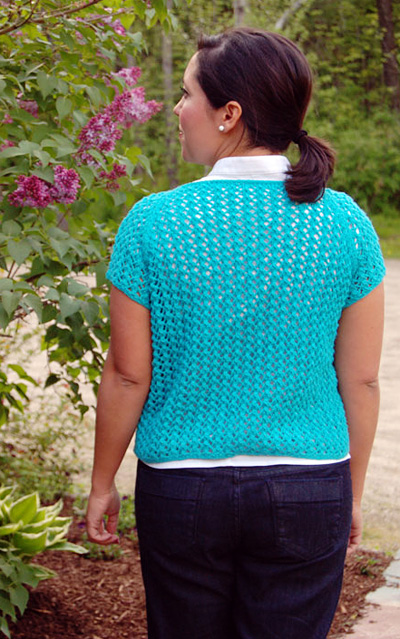
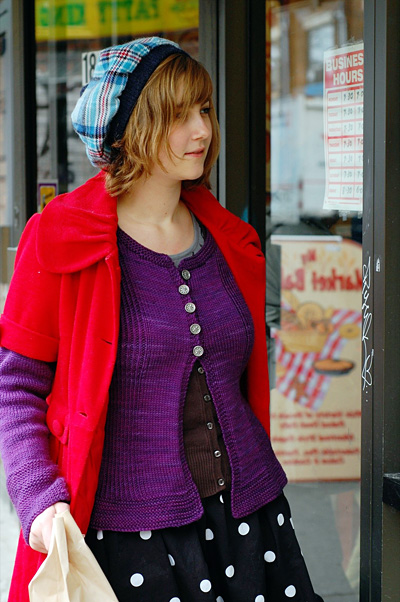
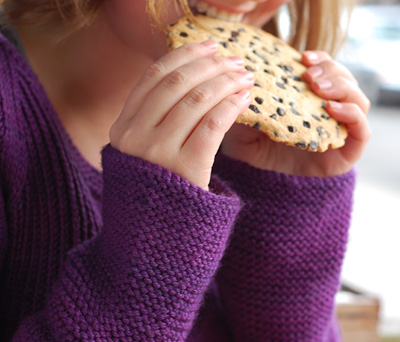
If you're like me, you look forward to summer the rest of the year, and
can't wait to shed those bulky, oversized, cold weather clothes. But unless you have the body of a nymph, or you work at a beach resort, you will most likely want to cover some of your problem spots, or counteract the air
conditioning chill with the perfect little lacy cardie. The beauty of this top is how easy you can lengthen the body and the sleeves. There is no shaping on either of them, so just knit as long as you want before beginning the raglan decreases. Babyboo, the yarn I selected for this project, is a dk weight soft bamboo blend yarn. When working in plain stockinette stitch, it looks best worked with US size 5 needles for the average knitter. I opted for US size 7 needles to further emphasize the lacy effect of the pattern stitch. It also took less yarn than
anticipated -- just 6 balls for the size medium. |
| XS [S, M, L, 1X, 2X, 3X] (shown in size M) | Chest: 30[34.25, 38.5, 42.75, 47, 51.25, 55.5] inches
Length: 16[16.5, 17, 17.75, 18, 18.5, 19] inches |
|  Knit One, Crochet Too Babyboo [55% nylon/45% bamboo; 115yd/105m per 50g ball]; color #548 Bright Aqua; 4[5, 6, 7, 7, 8, 9] balls Knit One, Crochet Too Babyboo [55% nylon/45% bamboo; 115yd/105m per 50g ball]; color #548 Bright Aqua; 4[5, 6, 7, 7, 8, 9] balls
Recommended needle size:
1 US #7/4.5mm circular needle, 32 inches or longer 1 spare circular needle, 32 inches or longer, US #7/4.5mm or smaller
1 US #G/6 / 4mm crochet hook
2 stitch holders
4 stitch markers
Yarn needle
Row counter (optional)
7 buttons, 0.5 inch diameter
Note: Buy buttons after sweater is complete to ensure correct size. |
| 17 sts/28 rows = 4 inches in Fishnet Pattern |
|
| sk2p: Sl 1, k2tog, pass slipped st over. 2 sts decreased. Seed Stitch (Worked over an odd number of sts):
All Rows: K1, [p1, k1] to end. Fishnet Pattern (Worked over a multiple of 6 sts + 3):
Row 1 [RS]: K3, [yo, sk2p, yo, k3] to end.
Row 2: P all sts.
Row 3: Yo, sk2p, yo, [k3, yo, sk2p, yo] to end.
Row 4: P all sts.
Repeat Rows 1–4 for Fishnet Pattern.
|  LOWER BODY
CO 133[151, 169, 187, 205, 223, 241] sts. Do not join; piece is worked back and forth in rows.
Work 2 rows in Seed Stitch. Set-up Row [RS]: Work 5 sts in Seed Stitch, place marker, work in Fishnet Pattern to last 5 sts, place marker, work in Seed Stitch to end.
This row sets pattern for lower body. First and last 5 sts are worked in Seed Stitch, with buttonholes placed as described below; all other sts are worked in Fishnet Pattern. Work 13[17, 21, 25, 15, 19, 23] rows in pattern, ending with a WS row. Note: As written, cardigan measures 12 inches to underarm after blocking. If more length is desired, work more rows before beginning buttonhole sequence; buttonhole placement is calculated so that top buttonhole is placed close to neckline. Alternately, if more length is desired, you may wish to use more buttons. Buttonhole sequence will continue into yoke; be sure to read ahead. Buttonhole Row [RS]: K1, p2tog, yo, p1, k1, work in pattern to end.
Work 15[15, 15, 15, 17, 17, 17] rows in pattern.
Repeat these 16[16, 16, 16, 18, 18, 18] rows 5 times more, then work Buttonhole Row once more. Continue in pattern until a total of 92 rows have been worked from CO edge, ending with a WS row; work measures approx. 12 inches. Next Row [RS]: Work 29[35, 38, 41, 44, 47, 50] sts in pattern, BO 9[9, 12, 15, 18, 21, 24] sts, work 57[63, 69, 75, 81, 87, 93] sts in pattern (including 1 st remaining on right needle after binding off), BO 9[9, 12, 15, 18, 21, 24] sts, work in pattern to end. 115[133, 145, 157, 169, 181, 193] sts: 29[35, 38, 41, 44, 47, 50] sts for each front, 57[63, 69, 75, 81, 87, 93] sts for back.
Place all sts on hold on spare circular needle. Do not break yarn; work sleeves with a new ball of yarn. 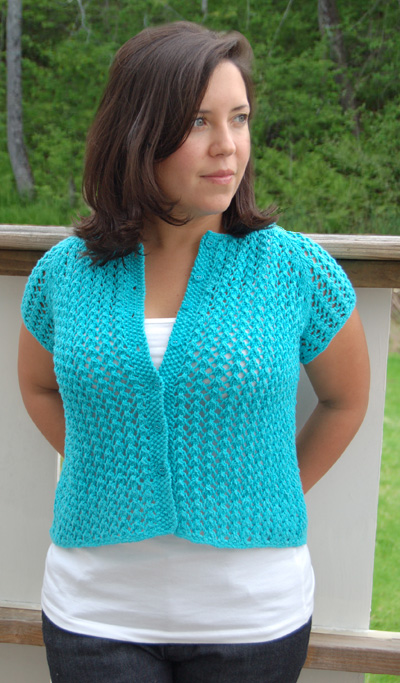
SLEEVES
CO 44[47, 53, 59, 65, 71, 77] sts. Size XS Only:
Row 1 [RS]: [K1, p1] to end.
Row 2 [WS]: [P1, k1] to end
.
Row 3 [RS]: K4, [yo, sk2p, yo, k3] to last 4 sts, yo, sk2p, yo, k1.
Row 4 [WS]: P all sts.
Row 5 [RS]: K1, [yo, sk2p, yo, k3] to last st, k1.
Row 6 [WS]: P all sts.
Repeat Rows 3-6 until sleeve measures 2 inches or desired length to underarm, ending with a WS row. Sizes S, M, L, 1X, 2X, 3X Only:
Work 2 rows in Seed Stitch.
Next Row [RS]: K1, work in Fishnet Pattern to last st, k1.
Next Row [WS]: P1, work in Fishnet Pattern to last st, p1.
Continue in pattern as set until sleeve measures 2 inches or desired length to underarm, ending with a WS row. All Sizes:
Next Row [RS]: BO 5[5, 6, 8, 9, 11, 12] sts, work in pattern to last 5[5, 6, 8, 9, 11, 12] sts, BO all sts to end.
Place remaining 34[37, 41, 43, 47, 49, 53] sts on st holder. Make a second sleeve in the same way. YOKE
Note: While shaping yoke, continue in Fishnet Pattern as set. As you work the raglan shaping, when you find that you do not have enough sts to work a [yo, sk2p, yo] set, work these sts in stockinette st instead. Remember to continue working buttonhole sequence as you work the yoke. Joining Row [WS]: Using circular needle and yarn attached to lower body, work 29[35, 38, 41, 44, 47, 50] sts of left front, place marker, work 34[37, 41, 43, 47, 49, 53] sts of one sleeve, place marker, work 57[63, 69, 75, 81, 87, 93] sts of back, place marker, work 34[37, 41, 43, 47, 49, 53] sts of remaining sleeve, place marker, work 29[35, 38, 41, 44, 47, 50] sts of right front. 183[207, 227, 243, 263, 279, 299] sts. Raglan Decrease Row [RS]: [Work in pattern to 2 sts before marker, ssk, slip marker, k2tog] four times, work in pattern to end. 8 sts decreased.
Work 1 row in pattern.
Repeat these 2 rows 9[11, 13, 15, 16, 18, 20] times more. 103[111, 115, 115, 127, 127, 131] sts: 19[23, 24, 25, 27, 28, 29] sts for each front, 14[13, 13, 11, 13, 11, 11] sts for each sleeve, and 37[39, 41, 43, 47, 49, 51] sts for back. Shape Neckline:
Note: When shaping neckline, continue working raglan decreases on all RS rows as set.
Row 1 [RS]: BO 11[15, 16, 17, 19, 20, 21] sts; work in pattern to end. 84[88, 91, 90, 100, 99, 102] sts.
Row 2 [WS]: BO 12[16, 17, 18, 20, 21, 22] sts, p to last 2 sts, p2tog tbl. 71[71, 73, 71, 79, 77, 79] sts.
Row 3 [RS]: Ssk, work in pattern to last 2 sts, k2tog. 61[61, 63, 61, 69, 67, 69] sts.
Row 4 [WS]: P2tog, p to last 2 sts, p2tog tbl. 59[59, 61, 59, 67, 65, 67] sts.
Row 5 [RS]: Work as for Row 3. 49[49, 51, 49, 57, 55, 57] sts.
Row 6 [WS]: P all sts, removing first and last markers.
Row 7 [RS]: K3tog (last st of front worked together with first 2 sts of sleeve), work in pattern to last 3 sts, sk2p. 41[41, 43, 41, 49, 47, 49] sts. Size XS Only:
Row 8 [WS]: P1, [p2tog] twice, p to last 5 sts, [p2tog] twice, p1. 37 sts. Sizes S, M, 1X Only:
Row 8 [WS]: P1, p3tog, p to last 4 sts, p3tog, p1. -[37, 39, -, 45, -, -] sts. Sizes L, 2X, 3X Only:
Row 8 [WS]: P all sts. -[-, -, 41, -, 47, 49] sts. All Sizes:
BO all sts. | 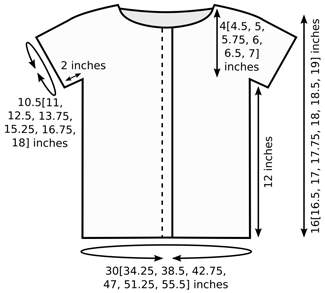 Beginning at right front neckline edge, work 1 row single crochet along neckline edge, ending at left front neckline edge. Beginning at right front neckline edge, work 1 row single crochet along neckline edge, ending at left front neckline edge.
Sew sleeve seams. Sew sleeves to lower body at underarms. Weave in ends.
Sew buttons to button band, opposite buttonholes. |
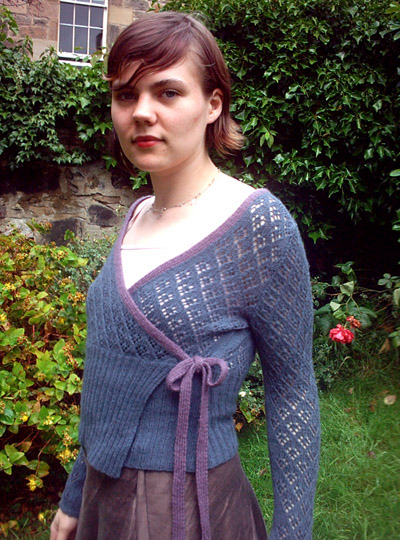
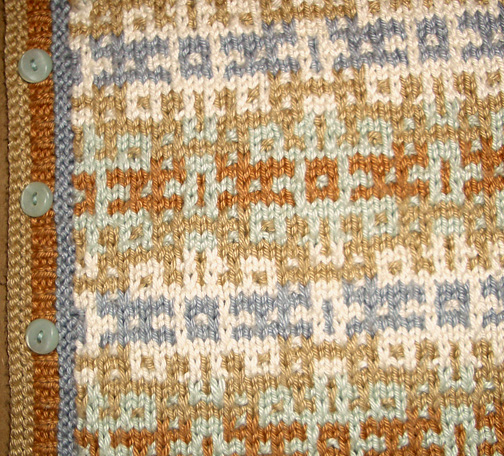
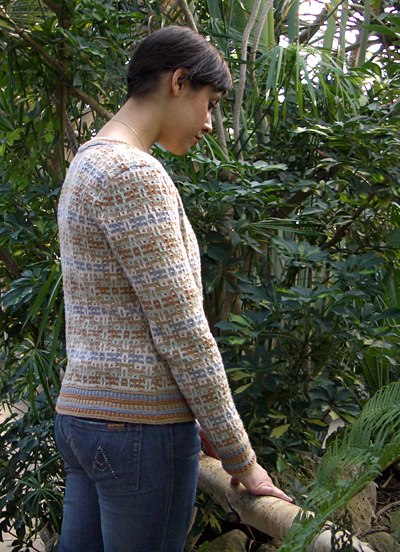
Soft, subtle colors mix with warm and cool neutrals for a sweater that will harmonize equally well with blue jeans or khakis. The grey bounces off the warmer tones so you would swear it was slate blue, a striking example of how a color can vary depending on its context. The yarn is a cotton-modal blend that is soft, drapey and a pleasure to knit. The body is gently shaped to avoid a boxy shape and has a little bit of extra room in the front to help prevent gaping button bands. Although it may look like fair isle at first glance, this is a mosaic pattern — no stranding, just one color per row. |
|
|
| |
| XS [S, M, L, XL,] (shown in size S) | |
|
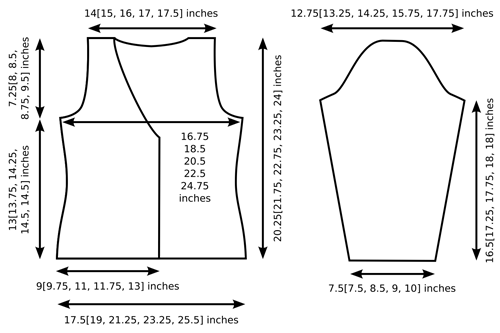
Chest: 33.5[36.75, 41.25, 45, 49.5] inches
Length: 20.25[21.75, 22.75, 23.25, 24] inches | |
|
Knit Picks Shine Sport [60% Pima Cotton, 40% Modal; 110yd/100m per 50 g skein]
 [A] #23816 Willow; 5[5, 6, 6, 7] skeins [A] #23816 Willow; 5[5, 6, 6, 7] skeins
[B] #23620 Sand; 2[3, 3, 3, 4] skeins
[C] #23616 Cloud; 2[2, 3, 3, 3] skeins
[D] #23815 Silver Sage; 3[3, 4, 4, 4] skeins
[E] #23615 Cream; 3[3, 3, 4, 4] skeins
1 US #2/2.75mm circular needle, 24 inches or longer
1 set US #3/3.25mm straight needles
Stitch holders
Safety pins
Tapestry needle
5[6, 6, 6, 7] x 0.5 inch buttons | |
|
24 sts / 32 rows = 4 inches in stockinette stitch using larger needles
25 sts / 44 rows = 4 inches in charted pattern using larger needles, after blocking | |
|
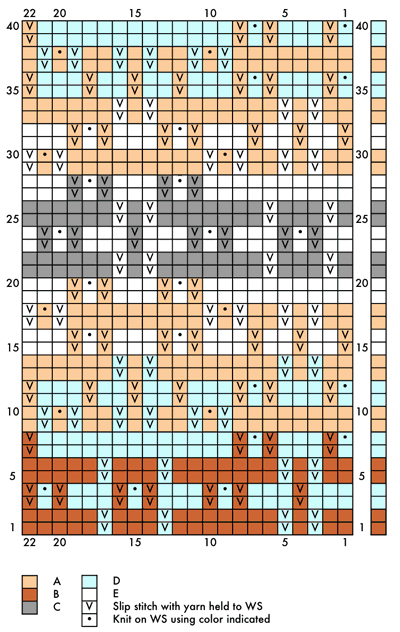
[Knitty's list of standard abbreviations and techniques can be found here] | This is a slip stitch, or mosaic pattern. Each row is worked using only one color, with stitches slipped in each row. As a result, stitches from previous rows appear to have been worked in a color pattern with the stitches in the current row.
When reading the chart, the column to the right of the chart indicates which color is to be used for each row. All stitches in a row which are shown in a contrasting color, should be slipped (as indicated). Every knit row is followed by a purl row of the same color, and the stitches that were worked in the knit row are worked again in the purl row.
To work a slip stitch, transfer it to the right needle without knitting or purling it. It should be slipped in such a way that it is ready to knit on the next row; for most knitters this means slipping purlwise. The working yarn is always held to the wrong side of the fabric as a stitch is slipped, and should be carried loosely behind the slipped stitch to prevent the fabric from puckering.
Do not slip the first or last stitch of any row. Maintain the first and last stitches of each row in stockinette stitch, working them in the working color for that row, regardless of what is indicated in the chart. This will produce a stable edge for seaming.
The knitted fabric produced by this pattern improves with blocking. It is important to block the gauge swatch before measuring, both to obtain an accurate measurement and to see the finished texture of the fabric.
Carry the colors not in use loosely up the side of the work. They may be cut and rejoined when necessary (at the beginning of the armhole shaping, for example). When beginning a RS row, bring the working yarn from under the other yarns to keep the edge tidy.
For all sizes, the sleeves to the beginning of the sleeve cap shaping are 40 rows (one full repeat) longer than the lower body to the beginning of the armhole shaping. This ensures that the pattern matches at the point where sleeve meets body. If you wish to change the length of the sleeves or body, ideally they should both be altered by the same number of rows. Alternately, the sleeve may be shortened by 1.25 inches by casting on 49[49, 55, 59, 65] sts and omitting the first 16 rows of the Sleeve Border (begin working border on Row 17).
The Long-Tail Cast On is recommended for this project. Directions for the Long-Tail Cast On
Directions for the One-Row Buttonhole used for this sweater may be found
Three-Needle Bind Off using Two Needles:
This is my preferred method for working a Three-Needle Bind Off.
With right sides facing, slip the sts of the two pieces to be joined onto one smaller needle, so that they alternate: [1 st from front piece, 1 st from back piece] to end.
Using the yarn attached and the larger needle, k2tog, [k2tog, pass first st worked over second st] until all sts have been worked. Break yarn and draw through loop on needle.
1x1 Rib (Worked over an odd number of sts):
Row 1 [WS]: P1, [k1, p1] to end.
Row 2 [RS]: K1, [p1, k1] to end.
Repeat these 2 rows for 1x1 Rib.
Ssp: Slip the next 2 sts knitwise, one at a time, to the right needle. Slip them back to the left needle and purl them together through their back loops. | |
|
 BACK BACK
Using US #2/2.75mm needle and A, CO 109[119, 133, 145, 159] sts.
Lower Border:
Note: Row 1 is a WS row.
Rows 1-3: K all sts.
Row 4 [RS]: Using B, k all sts.
Rows 5-7: Using B, work in 1x1 Rib.
Rows 8-11: Using C, k all sts.
Row 12 [RS]: Using A, k all sts.
Rows 13-15: Using A, work in 1x1 Rib.
Rows 16-19: Using B, k all sts.
Row 20 [RS]: Using C, k all sts
Rows 21-23: Using C, work in 1x1 Rib.
Rows 24-27: Using A, k all sts.
Lower Back:
Using US #3/3.25mm needles and D, work 2 rows in stockinette st.
Work Row 1 of Chart, beginning with st number 5[11, 4, 9, 13], and ending with st number 3[19, 4, 21, 17].
Work 7 more rows in pattern as set.
Shape Waist:
Decrease Row [RS]: Continuing in pattern, k1, ssk, work to last 3 sts, k2tog, k1.
Work 9[9, 11, 11, 11] rows in pattern.
Repeat these 10[10, 12, 12, 12] rows twice more, then work Decrease Row once more. 101[111, 125, 137, 151] sts.
Work 39 rows in pattern.
Increase Row [RS]: K1, m1, work to last st, m1, k1.
Work 9[9, 11, 11, 11] rows in pattern, then work Increase Row once more. 105[115, 129, 141, 155] sts.
Continue in pattern until work measures 13[13.75, 14.25, 14.5 14.5] inches, ending with a WS row. Make a note of the last pattern row worked.
Shape Armholes:
BO 4[4, 5, 6, 9] sts at beginning of next 2 rows. 97[107, 119, 129, 137] sts.
Decrease Row [RS]: K1, ssk, work in pattern to last 3 sts, k2tog, k1.
Repeat Decrease Row every 2 rows 2[2, 3, 7, 8] times. 91[101, 111, 113, 119] sts.
Repeat Decrease Row every 4 rows 2[4, 5, 3, 5] times. 87[93, 101, 107, 109] sts.
Continue in pattern as set until work measures 6.25[7, 7.5, 7.75, 8.5] inches from beginning of armhole, ending with a WS row.
Shape Back Neckline:
Row 1 [RS]: Work 34[36, 38, 39, 40] sts in pattern; place remaining sts on st holder.
Row 2 [WS]: BO 6 sts, work in pattern to end.
Row 3 [RS]: Work all sts in pattern.
Row 4 [WS]: Work as for Row 2. 22[24, 26, 27, 28] sts.
Row 5 [RS]: Work in pattern to last 3 sts, k2tog, k1.
Row 6 [WS]: Work all sts in pattern.
Rows 7-8: Work as for Rows 5-6. 20[22, 24, 25, 26] sts.
Work 3 more rows in pattern. Work measures 7.25[8.25, 8.5, 8.75, 9.5] inches from beginning of armhole. Place sts on st holder.
Replace held sts on needle with RS facing and rejoin yarn.
Row 1 [RS]: BO 19[21, 25, 29, 29] sts, work in pattern to end. 34[36, 38, 39, 40] sts.
Row 2 [WS]: Work all sts in pattern.
Row 3 [RS]: BO 6 sts, work in pattern to end.
Rows 4-5: Work as for Rows 2-3. 22[24, 26, 27, 28] sts.
Row 6 [WS]: Work all sts in pattern.
Row 7 [RS]: K1, ssk, work in pattern to end.
Rows 8-9: Work as for Rows 6-7. 20[22, 24, 25, 26] sts.
Work 2 more rows in pattern. Place sts on st holder.
 LEFT FRONT LEFT FRONT
Note: Read ahead! Neckline shaping is worked at the same time as Waist and Armhole shaping.
Using US #2/2.75mm needle and A, CO 56[61, 68, 74, 81] sts.
Work Rows 1-27 of Border as for Back.
Using US #3/3.25mm needles and D, work 2 rows in stockinette st.
Work Row 1 of Chart, beginning with st number 4[11, 4, 8, 13], and ending with st number 15[5, 5, 15, 5].
Work 7 more rows in pattern as set.
Shape Waist:
Decrease Row [RS]: Continuing in pattern, k1, ssk, work in pattern to end.
Work 9[9, 11, 11, 11] rows in pattern.
Repeat these 10[10, 12, 12, 12] rows twice more, then work Decrease Row once more. 52[57, 64, 70, 77] sts.
Work 39 rows in pattern.
Increase Row [RS]: K1, m1, work in pattern to end.
Work 9[9, 11, 11, 11] rows in pattern, then work Increase Row once more. 54[59, 66, 72, 79] sts.
AT THE SAME TIME: When work measures 9.75[10.75, 11, 11.5, 12] inches, ending with a WS row, shape neckline as follows:
Neckline Decrease Row [RS]: Work in pattern to last 3 sts, k2tog, k1.
Repeat Neckline Decrease Row every 4 rows 21[17, 18, 26, 27] times.
Repeat Neckline Decrease Row every 6 rows 3[8, 9, 3, 2] times.
AT THE SAME TIME: When work measures same as Back to underarms, ending with same row of pattern, shape armhole as follows:
Next Row [RS]: BO 4[4, 5, 6, 9] sts, work in pattern to end.
Work 1 row in pattern.
Armhole Decrease Row [RS]: K1, ssk, work in pattern to end.
Repeat Armhole Decrease Row every 2 rows 2[2, 3, 7, 8] times.
Repeat Armhole Decrease Row every 4 rows 2[4, 5, 3, 5] times.
When all neckline and armhole shaping has been worked, 20[22, 24, 25, 26] sts remain. Continue in pattern until work measures same as Back to shoulder, ending with same pattern row.
Join sts on needle to sts of Back Left Shoulder using Three-Needle Bind Off (or Three-Needle Bind Off using Two Needles: see Pattern Notes, above).
RIGHT FRONT
Note: Read ahead! Neckline shaping is worked at the same time as Waist and Armhole shaping.
Using US #2/2.75mm needle and A, CO 56[61, 68, 74, 81] sts.
Work Rows 1-27 of Border as for Back.
Using US #3/3.25mm needles and D, work 2 rows in stockinette st.
Work Row 1 of Chart, beginning with st number 15[3, 3, 15, 3], and ending with st number 4[19, 4, 22, 17].
Work 7 more rows in pattern as set.
Shape Waist:
Decrease Row [RS]: Work in pattern to last 3 sts, k2tog, k1.
Work 9[9, 11, 11, 11] rows in pattern.
Repeat these 10[10, 12, 12, 12] rows twice more, then work Decrease Row once more. 52[57, 64, 70, 77] sts.
Work 39 rows in pattern.
Increase Row [RS]: Work in pattern to last st, m1, k1.
Work 9[9, 11, 11, 11] rows in pattern, then work Increase Row once more. 54[59, 66, 72, 79] sts.
AT THE SAME TIME: When work measures 9.75[10.75, 11, 11.5, 12] inches, ending with a WS row, shape neckline as follows:
Neckline Decrease Row [RS]: K1, ssk, work in pattern to end.
Repeat the Neckline Decrease Row every 4 rows 21[17, 18, 26, 27] times.
Repeat the Neckline Decrease Row every 6 rows 3[8, 9, 3, 2] times.
AT THE SAME TIME: When work measures 1 row longer than Back to underarms, shape armhole as follows:
Next Row [WS]: BO 4[4, 5, 6, 9] sts, work in pattern to end.
Armhole Decrease Row [RS]: Work in pattern to last 3 sts, k2tog, k1.
Repeat Armhole Decrease Row every 2 rows 2[2, 3, 7, 8] times.
Repeat Armhole Decrease Row every 4 rows 2[4, 5, 3, 5] times.
When all neckline and armhole shaping has been worked, 20[22, 24, 25, 26] sts remain. Continue in pattern until work measures same as Back to shoulder, ending with same pattern row.
Join sts on needle to sts of Back Right Shoulder using Three-Needle Bind Off (or Three-Needle Bind Off using Two Needles).
SLEEVES (Make 2)
Using US #2/2.75mm needle and A, CO 47[47, 53, 57, 63] sts.
Work Rows 1-9 of Border as for Back.
Row 10: K1, m1, k to last st, m1, k1.
Work Rows 11-19 of Border as for Back.
Row 20 [RS]: Using C, k1, m1, k to last st, m1, k1. 51[51, 57, 61, 67] sts.
Work Rows 21-27 of Border as for Back.
Next Row [RS]: Using US #3/3.25mm needles and D, k1, m1, k to last st, m1, k1. 53[53, 59, 63, 69] sts.
P 1 row.
Work Row 1 of Chart, beginning with st number 22[22, 19, 17, 14], and ending with st number 8[8, 11, 13, 16].
Work 9[9, 11, 11, 11] rows in pattern.
Sleeve Increase Row [RS]: K1, m1, work in pattern to last st, m1, k1.
Repeat Sleeve Increase Row every 10[10, 10, 8, 8] rows 4[14, 9, 7, 20] times. 63[83, 79, 79, 111] sts.
Sizes XS, M, L Only:
Repeat Sleeve Increase Row every 12[-, 12, 10, -] rows 8[-, 5, 10, -] times. 79[-, 89, 99, -] sts.
All Sizes:
Continue in pattern until work measures 16.5[17.25, 17.75, 18, 18] inches, ending with last pattern row worked for Back at underarm.
Shape Sleeve Cap:
BO 4[4, 5, 6, 9] sts at beginning of next 2 rows. 71[75, 79, 87, 93] sts.
Decrease Row 1 [RS]: K1, ssk, work in pattern to last 3 sts, k2tog, k1.
Decrease Row 2 [WS]: P1, p2tog, work in pattern to last 3 sts, ssp, p1.
Repeat these 2 rows 2[2, 2, 1, 2] times more, then work Decrease Row 1 once more. 57[61, 65, 77, 79] sts.
Repeat Decrease Row 1 every 2 rows 6[6, 5, 10, 8] times. 45[49, 55, 57, 63] sts.
Repeat Decrease Row 1 every 4 rows 3[7, 7, 5, 6] times. 39[35, 41, 47, 51] sts.
Repeat Decrease Row 1 every 2 rows 5[3, 7, 6, 10] times. 29[29, 27, 35, 31] sts.
Work Decrease Row 1.
Work Decrease Row 2.
Repeat these 2 rows 2[1, 1, 3, 1] times more.
Size S Only:
Work Decrease Row 1.
All Sizes:
BO remaining 17[19, 19, 19, 23] sts. | |
| | | Use safety pins to mark desired locations for 5[6, 6, 6, 7] buttons along right front edge. Place first buttonhole close to lower edge, and last buttonhole just below beginning of neckline shaping. Front Band:
With RS facing, using #2/2.75mm needle and C, pick up and k 7 sts for every 12 rows and 1 st in each bound-off st along right front edge, along back neckline edge, and along left front edge.
Rows 1-3: K all sts. Break C.
Row 4 [RS]: Using B, k all sts.
Row 5 [WS]: Work in 1x1 Rib.
Row 6 [RS]: Work in 1x1 Rib, working buttonholes at points indicated by safety pins.
(See Pattern Notes above for a link to directions for the buttonhole used for this sweater.)
Row 7 [WS]: Work in 1x1 Rib. Break B.
Rows 8-10: Using A, k all sts.
Row 11 [WS]: BO all sts knitwise. Sew sleeves into armholes. Sew sleeve seams and side seams.
Weave in any remaining ends.
Sew buttons to left front band, opposite buttonholes. CARE
Although Knit Picks suggests careful machine drying for this yarn, the texture created by the mosaic pattern looks best when dried flat. |
I inherited the yarn for this cardigan from my grandfather. He was an amazingly skilled knitter. During the World War Two he was an RAF engineer and was taught to knit while recovering in hospital after injuring himself while working on a plane. He loved the combination of math and knitting and worked mnly highly complex Fair Isle designs. He died when I was seven long before I learned to enjoy knitting (although I do remember making pom poms fom his leftover scraps). When my grandmother passed away last year I inherited two huge bags of his yarn that were found in her attic. This beautiful vintage 3 ply was my favorite and luckily there was just enough to make this cardigan. The wrapover is my favorite style and is one that flatters most body types. The lace and deep ribbing at the waist were inspired by vintage patterns from the forties and fifties. And, if, like me, you have to deal with the unpredictability of the Scottish climate you can wear this all year round. The original yarn is a 3ply by Patons that was discontinued years ago but any fine 4 ply will make a good if slightly heavier 4 ply. I like the Jaeger Matchmaker I chose for the neckband and ties. It's fine and soft, comes in a wide variety of colors and is machine washable. | |  model: Ysolda S. Teague photos: Sheena Stewart and Angela Cassidy model: Ysolda S. Teague photos: Sheena Stewart and Angela Cassidy |
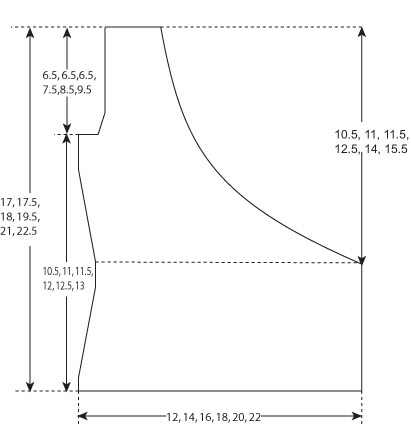
| | XS [S, M, L, XL, XXL] (shown in size S) |
| | Chest: 28[32, 36, 40, 44, 48] inches
Length: 17[17.5, 18, 19.5, 21, 22.5] inches |
| | | | Jaeger Matchmaker Merino 4 ply [100% merino wool;skein]
[MC] Baltic Blue 740; 8 [8, 9, 9, 10, 10] skeins
[CC] Heather 701; 1 skein
Note: the original yarn is vintage. This substitution will give very similar results. 1 set US #1/2.25mm straight needles
1 set US #2/2.75mm straight needles
Stitch holder
Small tapestry needle
4 hooks and eyes OR 4 small buttons |
| | 28 sts/ 44 rows = 4 inches in lace pattern after blocking |
| | [Knitty's list of standard abbreviations can be found here] 2x2 Rib (Worked over a multiple of 4 sts + 2)
Row 1 [RS]: [K2, p2] to last 2 sts, k2.
Row 2 [WS]: [P2, k2] to last 2 sts, p2.
Repeat these 2 rows for 2x2 Rib. 1x1 Rib (Worked over an odd number of sts)
Row 1 [RS]: [K1, p1] to last st, k1.
Row 2 [WS]: [P1, k1] to last st, p1.
Repeat these 2 rows for 1x1 Rib. When working increases or decreases to shape pieces that are worked in Lace Pattern, be sure that every increase (yo) within the Lace Pattern is balanced by a corresponding decrease, and vice versa. It may be necessary at some points to work some stitches in stockinette st until sufficient stitches have been increased or decreased to keep the pattern balanced. 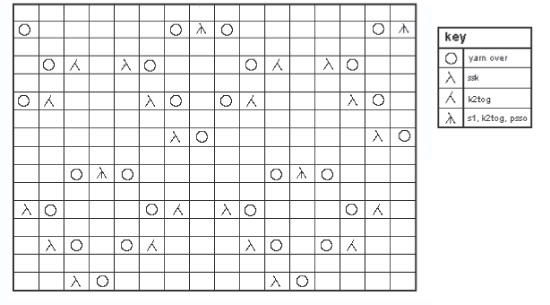
|
|   Back Back
Using smaller needles and MC, CO 98[114, 126, 142, 154, 170] sts.
Work 10 rows in 2x2 Rib. Next Row [RS]: K1, ssk, work in patt as set to last 3 sts, k2tog, k1. Work 7 rows in patt, maintaining 2 sts at each side in stockinette st. Repeat these 8 rows 6[7, 6, 7, 6, 7] times more. 84[98, 112, 126, 140, 154] sts rem. Cont in rib as set until work measures 6[6.25, 6.5, 6.75, 7, 7.25] inches, ending with a WS row. Next Row [RS]: Switch to larger needles and k all sts. P 1 row. Next Row [RS]: K1, m1, begin working Lace Pattern from chart, beginning with 16th[1st, 10th, 11th, 12th, 13th] st of chart; work to last st of row, ending with 1st[16th, 7th, 6th, 5th, 4th] st of chart, m1, k1. Work 7 rows in patt as set, incorporating new sts into Lace Pattern and maintaining edge sts in stockinette st.
Next Row [RS]: K1, m1, work to last st in Lace Pattern as set, m1, k1.
Repeat these 8 rows 5 times more. 98[112, 126, 140, 154, 168] Cont in patt as set until work measures 10.5[11, 11.5, 12, 12.5, 13] inches, ending with a WS row. Shape Armholes
BO 4[6, 6, 6, 8, 8] sts at beg of next 2 rows. 90[100, 114, 128, 138, 152] sts rem.
BO 0[0, 2, 4, 4, 6] sts at beg of next 2 rows. 90[100, 110, 120, 130, 140] sts rem. Next Row [RS]: K1, ssk, work in patt to last 3 sts, k2tog, k1.
Work 3 rows in patt as set.
Repeat these 4 rows 3 times more. 82[92, 102, 112, 122, 132] sts rem. Cont in patt until work measures 15.5[16, 16.5, 18, 19.5, 21] inches when lace is very slightly stretched (to simulate light blocking), ending with a WS row. Next Row [RS]: Work 26[28, 30, 34, 38, 42] sts in patt, place these sts just worked on st holder, BO 30[36, 42, 44, 46, 48] sts, work to end in patt. 26[28, 30, 34, 38, 42] sts on needle. Left Shoulder
Next Row [WS]: P to last 3 sts, p2tog tbl, p1.
Next Row [RS]: K1, ssk, work in patt to end.
Repeat these 2 rows 4 times more. BO rem 16[18, 20, 24, 28, 32] sts. Right Shoulder
Place held sts on needle with WS facing, rejoin yarn. Next Row [WS]: P1, p2tog, p to end.
Next Row [RS]: Work in patt to last 3 sts, k2tog, k1.
Repeat these 2 rows 4 times more. BO rem 16[18, 20, 24, 28, 32] sts. Right Front
Using smaller needles and MC, CO 86[98, 114, 126, 142, 154] sts.
Work 10 rows in 2x2 Rib. Next Row [RS]: Work in patt as set to last 3 sts, k2tog, k1.
Work 7 rows in patt, maintaining 2 sts at each side in stockinette st.
Repeat these 8 rows 6 times more. 79[91, 107, 119, 135, 147] sts rem. Cont in rib as set until work measures 6[6.25, 6.5, 6.75, 7, 7.25] inches, ending with a WS row. Next Row [RS]: Switch to larger needles and k all sts.
P 1 row. Notes:
Neckline Shaping and Side Shaping both begin on the next row. There is an ssk worked at the beginning of the first Side Shaping row; this is the same ssk that is worked at the beginning of the first Neckline Shaping row.
Read through pattern carefully before continuing!
Different sets of shaping are worked simultaneously. Side Shaping
Next Row [RS]: K1, ssk, begin working Lace Pattern from chart, beginning with 1st st of chart; work to last st of row, ending with 9th[7th, 7th, 3rd, 3rd, 15th] st of chart, m1, k1. Work 7 rows in patt as set, incorporating new st into Lace Pattern and maintaining edge sts in stockinette st.
Next Row [RS]: Work to last st in Lace Pattern as set, m1, k1.
Repeat these 8 rows 5 times more.
AT THE SAME TIME: Work Neckline Shaping as follows:
Next Row [RS]: K1, ssk, work in patt to end.
Next Row [WS]: P to last 3 sts, p2tog tbl, p1.
Repeat these 2 rows 16[22, 29, 32, 36, 40] times more. Next Row [RS]: K1, ssk, work in patt to end.
P 1 row.
Repeat these 2 rows 17[15, 16, 14, 16, 14] times more. Next Row [RS]: K1, ssk, work in patt to end.
Work 3 rows in patt.
Repeat these 4 rows 11[9, 6, 8, 8, 8] times more.
AT THE SAME TIME: When work measures 10.5[11, 11.5, 12, 12.5, 13] inches, ending with a RS row, shape armhole as follows:
Next Row [WS]: BO 4[6, 6, 6, 8, 8] sts, p to end.
Work 1 row in patt.
Next Row [WS]: BO 0[0, 2, 4, 4, 6] sts, p to end. Next Row [RS]: Work in patt to last 3 sts, k2tog, k1.
Work 3 rows in patt as set.
Repeat these 4 rows 3 times more. When all shaping is completed, 16[18, 20, 24, 28, 32] sts rem.
When work measures same as back to shoulder, BO all sts. Left Front
Using smaller needles and MC, CO 86[98, 114, 126, 142, 154] sts.
Work 10 rows in 2x2 Rib. Next Row [RS]: K1, ssk, work in patt as set to end.
Work 7 rows in patt, maintaining 2 sts at each side in stockinette st.
Repeat these 8 rows 6 times more. 79[91, 107, 119, 135, 147] sts rem. Cont in rib as set until work measures 6[6.25, 6.5, 6.75, 7, 7.25] inches, ending with a WS row. Next Row [RS]: Switch to larger needles and k all sts.
P 1 row. Notes:
Neckline Shaping and Side Shaping both begin on the next row. There is a k2tog worked at the end of the first Side Shaping row; this is the same k2tog that is worked at the end of the first Neckline Shaping row.
Read through pattern carefully before continuing!
Different sets of shaping are worked simultaneously. Side Shaping
Next Row [RS]: K1, m1, begin working Lace Pattern from chart, beginning with 8th[10th, 10th, 14th, 14th, 2nd] st of chart; work to last 3 sts, ending with 16th st of chart, k2tog, k1. Work 7 rows in patt as set, incorporating new sts into Lace Pattern and maintaining edge sts in stockinette st.
Next Row [RS]: K1, m1, work in Lace Pattern as set.
Repeat these 8 rows 5 times more.
AT THE SAME TIME: Work Neckline Shaping as follows:
Next Row [RS]: Work in patt to last 3 sts, k2tog, k1.
Next Row [WS]: P1, p2tog, p to end.
Repeat these 2 rows 16[22, 29, 32, 36, 40] times more. Next Row [RS]: Work in patt to last 3 sts, k2tog, k1.
P 1 row.
Repeat these 2 rows 17[15, 16, 14, 16, 14] times more. Next Row [RS]: Work in patt to last 3 sts, k2tog, k1.
Work 3 rows in patt.
Repeat these 4 rows 11[9, 6, 8, 8, 8] times more.
AT THE SAME TIME: When work measures 10.5[11, 11.5, 12, 12.5, 13] inches, ending with a WS row, shape armhole as follows:
Next Row [RS]: BO 4[6, 6, 6, 8, 8] sts, work in patt to end.
P 1 row.
Next Row [RS]: BO 0[0, 2, 4, 4, 6] sts, work in patt to end. P 1 row.
Next Row [RS]: K1, ssk, work in patt to end.
Work 3 rows in patt as set.
Repeat these 4 rows 3 times more. When all shaping is completed, 16[18, 20, 24, 28, 32] sts rem.
When work measures same as back to shoulder, BO all sts. Sleeves (Make 2)
Using larger needles and MC, CO 52[56, 60, 68, 76, 84] sts.
K 6 rows.
Next Row [RS]: Begin working Lace Pattern from chart, beginning with 16th[14th, 12th, 16th, 12th, 16th] st of chart; work to last st of row, ending with 1st[3rd, 5th, 1st, 5th, 1st] st of chart.
Cont in Lace Pattern as set until work measures 5 inches, ending with a WS row. Next Row [RS]: K1, m1, work to last st in Lace Pattern as set, m1, k1.
Work 9 rows in patt as set, incorporating new sts into Lace Pattern and maintaining edge sts in stockinette st.
Next Row [RS]: K1, m1, work to last st in Lace Pattern as set, m1, k1.
Repeat these 10 rows 12[12, 12, 12, 13, 13] times more. 80[84, 88, 96, 106, 114] sts. Cont in patt until work measures 17.75[18, 18.25, 18.5, 18.75, 19] inches or desired length to underarm, ending with a WS row. Shape Sleeve Cap
BO 4[6, 6, 6, 8, 8] sts at beg of next 2 rows. 72[72, 76, 84, 90, 98] sts rem.
BO 0[0, 2, 4, 4, 6] sts at beg of next 2 rows. 72[72, 72, 76, 82, 86] sts rem. Work 3 rows in patt.
Next Row [RS]: K1, ssk, work in patt to last 3 sts, k2tog, k1.
Repeat these 4 rows 2[2, 2, 4, 9, 12] times more. 66[66, 66, 66, 62, 60] sts rem. P 1 row.
Next Row [RS]: K1, ssk, work in patt to last 3 sts, k2tog, k1.
Repeat these 2 rows 18[18, 18, 16, 12, 11] times more. 28[28, 28, 32, 36, 36] sts rem. BO 2[2, 2, 3, 4, 4] sts at beg of next 4 rows.
BO rem 20 sts. |
| | Block pieces
Sew shoulder seams.
Sew sleeve seams and side seams using Mattress Stitch. Sew sleeves into armholes. Neckline Edging and Ties:
Using larger needles and CC, CO 9 sts.
Work in 1x1 Rib until work measures 76[80, 84, 88, 88, 92] inches.
BO all sts. Make a second tie in the same way, measuring 18 inches. Sew long tie to neckline edge, beginning at front edge of left front, continuing along left front edge, around back neck edge, and along front neckline edge, with remaining length of tie hanging loose at front edge of right front. Sew short tie to left side seam, just above ribbing. Hooks and eyes or buttons are used to fasten left front to inside of right side seam. If using buttons, button loops can be made by forming short crochet chains, long enough to fit around buttons. Sew eyes or button loops along inside of right side seam, evenly spaced along length of ribbing. Sew hooks or buttons along left front edge, corresponding to locations of eyes or button loops. 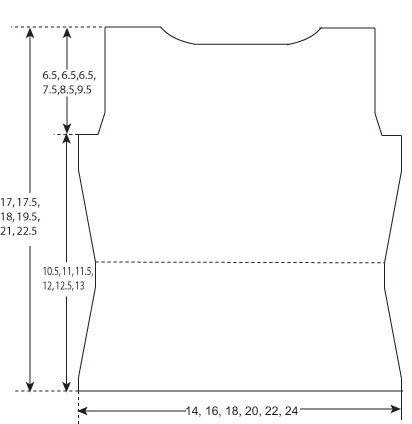
|
Get a little. Romance, that is. Ruffles, bell sleeves, lace and angora -- it’s a great girly-girl get-up. Start now and be ready just in time for the big V day. | |  model: Jillian Moreno photo: Andy model: Jillian Moreno photo: Andy
| | SIZE | | S[M, L, XL, XXL]
36[40,44,48,52] |
| | FINISHED MEASUREMENTS | | Chest: 39[43,47,52,56] inches |
| | MATERIALS | | Classic Elite Lush [50% Angora/50% wool, 123 yards/skein] color # 4441 -- 7[8,9,10,10] skeins 1 set of 32" long US #8/5mm circular needles [or size to obtain gauge]
1 set of 16" long US #8/5mm circular needles [or size to obtain gauge] Crochet hook size G
Markers
Stitch holder
1 button |
|
| | GAUGE | | 16 sts/20 rows = 4" in stockinette stitch |
| | DIRECTIONS | | Back
CO 79[87, 96, 104, 112].
Knit in moss st for 6 rows.
Knit in St st until back measures 12[12.5, 12.5, 12.5, 12.5] inches from hem.
Decrease for armholes: BO 5[5, 6, 6, 7] at the beginning of the next two rows.
Continue knitting in St st until armhole measures 8[8.5, 9, 9, 9.5] inches, then shape neck.
Neck shaping: K 24[27, 29, 33,35] sts, slip next 21[23, 26, 26, 28] sts onto a holder.
With a second ball of yarn, knit rem 24[27, 29, 33, 35] sts.
Neck decrease: dec 1 st at neck edge 2[2 , 2, 3, 2 ] times until 22[25, 27, 30, 33] sts remain.
Knit shoulders separately until armhole measures 9[9.5, 10, 10, 10.5] inches.
BO shoulders. Right front
CO 40[44, 49, 53, 57].
Work in moss st for 6 rows.
K in St st until front measures 4.5[5, 5, 5, 5.5 ] inches from cast on edge.
Neck decrease: dec 1 st at neck edge every 5th row 1[3, 15, 15, 15] times and then every 6th row 11[10, 0, 0, 1] times, until 22[25, 27, 30, 33] sts remain. AT THE SAME TIME, when front measures 12[12.5, 12.5, 12.5, 12.5] inches, dec for armholes: BO 5[5, 6, 6, 7 ] sts at beg of the next row opposite neck.
Continue in St st until armhole measures 9[9.5, 10, 10, 10.5] inches. Left front
Same as right front, but reverse the shaping. Sleeves [make 2]
CO 81[83, 89 91, 97] sts.
K 4[5, 5, 6, 9] sts, place marker, k 73[73, 79, 79, 79] sts, place marker, k 4[5, 5, 6, 9] remaining sts.
Work all sts on the outside markers in St st [all sleeve decreasing will be done in these sts].
All sts between the markers use the following 8 row lace stitch.  Lace pattern Lace pattern
Row 1: [WS] and all WS rows: p all sts
Row 2: k1, *k2tog, yo, k1, yo, ssk, k1 rep from *.
Row 4: k2tog, *yo, k3, yo, sl 2 sts knitwise, k1, p2sso, rep from * [last repeat: ssk instead of p2sso].
Row 6: k1, *yo, ssk, k1, k2tog, yo, k1, rep from *.
Row 8: k2, *yo, sl 2 sts knitwise, k1, p2sso, yo, k3, rep from * [last repeat: k2].
Dec 1 st on each edge of every 16 [16, 13, 13, 8]th row 3 [3, 4, 6,7] times. 75 [77, 81, 83, 83] sts total.
Continue k until 7 [7, 8, 8, 8 ] lace repeats plus 4 [0, 0, 0, 2] rows have been completed.
P 1 row
K 1 row
BO all sts.
|
| | FINISHING | | Block sleeves, fronts and back to size.
Sew together. Sleeve ruffle
Pick up 81[ 83, 89 91, 97] sts with 16-inch circular needle at cuff end of sleeve.
Join, being careful not to twist stitches.
Round 1: K
Round 2: K into the front and back of every stitch, doubling the number of sts on the needle.
Round 3: K
Round 4: K into the front and back of every stitch, doubling the number of sts on the needle.
Round 5: BO
Repeat for other sleeve. Neck ruffle
Starting at the lower right front of the V, with a 32" needle, pick up 64 [68, 68, 72, 72] sts up the right front of the sweater, k across 21[23, 26, 26, 28] neck sts on holder, pick up 64 [68, 68, 72, 72] sts down the left front of sweater.
Row 1: P
Row 2: K
Row 3: P
Row 4: K into the front and back of every stitch, doubling the number of sts on the needle.
Row 5: P
Row 6: K into the front and back of every stitch, doubling the number of sts on the needle.
Row 7: BO Button loop
With crochet hook, make a single chain of 16 sts [or, long enough to loop around button of choice, plus two sts]. Attach crochet chain as a loop to the right front of sweater. Sew button opposite. Weave in all ends. |
|
source:knitty.com
|

No comments:
Post a Comment