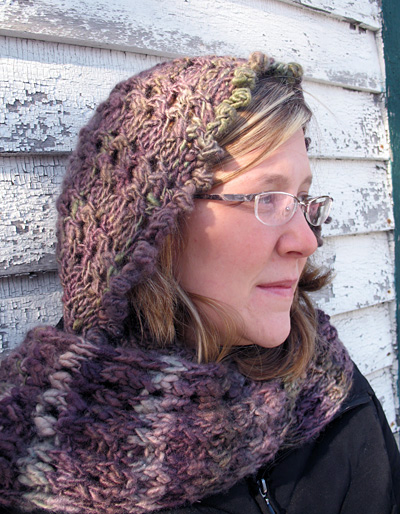
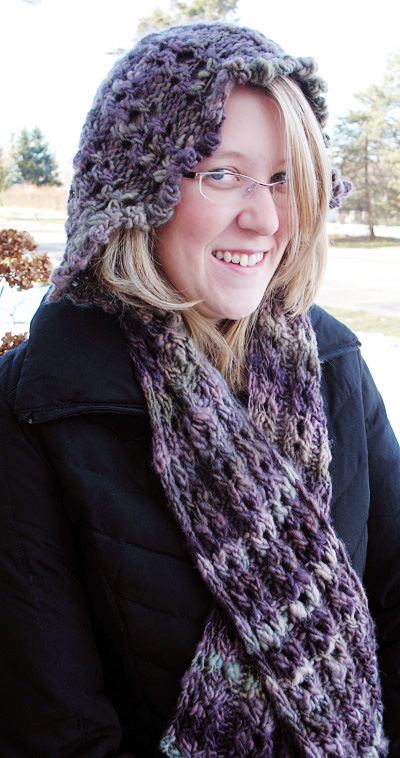
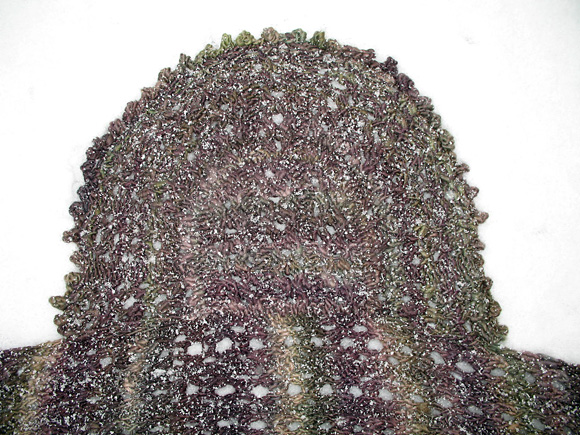
Wet block to open lace holes.
Artfully drape about your head and shoulders.
The Knitty Standard Book of British Birds [the key to our abbreviations & techniques]
|
| alt | alternate |
| approx | approximately |
| beg | begin[ning] |
|
|
|
| BO | bind off [cast off] |
| cab | cable |
| CC | contrasting color |
| cn | cable needle |
| CO | cast on |
| cont | continue[ing] |
| dec | decrease[ing] |
| dpn | double pointed needles[s] |
| foll | follow[s][ing] |
| g | grams |
| i-cord | When working I-cord, work is not turned. Instead of turning the work around to work back on the WS, slide all sts to the other end of the needle, switch the needle back to your left hand, bring the yarn around the back of the work, and start knitting the sts again. After the first 2 sts, give the yarn a sharp tug.
Repeat this row to form I-cord. After a few rows, the work will begin to form a tube. |
| inc | increase[ing] |
| incl | including |
| inst | instructions |
| k | knit |
| k tbl | knit through back of loop |
| k2tog | knit two together |
| kfb | knit into front and back of stitch |
| m | meter[s] |
| MB | make bobble |
| MC | main color |
| m1 | Make 1 stitch: Insert left needle, from front to back, under strand of yarn which runs between last stitch on left needle and first stitch on right needle; knit this stitch through back loop.
1 stitch increased. |
| mm | millimeters |
| mult | multiple |
| opp | opposite |
| oz | ounces |
| p | purl |
| p2tog | purl two together |
| patt[s] | pattern[s] |
| pfb | purl into front and back of stitch |
| pm | place marker |
| psso | pass slipped stitch[es] over |
| rem | remaining |
| rep | repeat |
| rev St st | reverse stockinette stitch |
| RS | right side[s] |
| rnd[s] | round[s] |
| sc | single crochet |
| SK2P | slip 1 stitch, knit two together, pass slipped stitch over |
| SSK | slip 2 stitches as if to knit, then knit those 2 stitches together |
| SSP | slip 2 stitches as if to purl, then purl those 2 stitches together |
| sl | slip |
| slp | slip one as if to purl |
| sl st | slip stitch |
| st[s] | stitch[es] |
| St st | stockinette stitch |
| tbl | through back of loop[s] |
| tog | together |
| WS | wrong side[s] |
| w&t | Wrap and turn. Bring yarn to front of work between needles, slip next st to right-hand needle, bring yarn around this st to back of work, slip st back to left-hand needle, turn work to begin working back in the other direction. |
| YO | yarn over |
| * * | repeat directions between ** as many times as indicated |
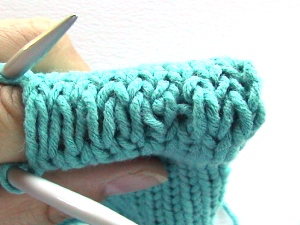
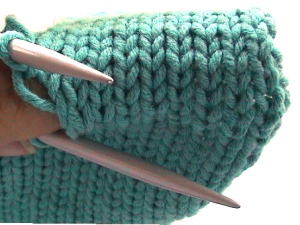
Bind off: Part Deux , I covered several (lots!) of the more common ways to bind off... and promised that this issue I'd cover the 3-needle and some decorative bind offs, so let's just get right to it, shall we? 3-Needle bind off
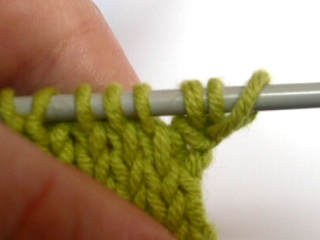
For the 3-needle bind off, you'll need -- surprise! -- 3 needles. The bind off joins two sets of live stitches that are still on the needle. It's an excellent way to bind off and join shoulder seams simultaneously. It provides a strong, stable seam that is nearly always less bulky than casting off and then sewing. It can be used to join any two sets of live stitches, but should be avoided for sock toes as it does leave a bit of a ridge on the inside of the knitting. But be careful -- it's quite easy, just like regular binding off, for this bind off to be done too tightly which will result in the seam puckering. A good way to avoid this is to use a needle a couple of sizes larger as your third needle, the one held in your right hand. You must have an equal number of stitches on 2 needles. For an invisible seam, have the right sides facing inwards, towards each other. 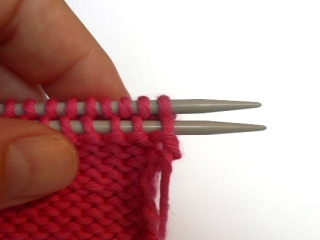
Hold the third, larger needle in your right hand. *Insert it knitwise into the first stitch on the needle closest to you and at the same time knitwise into the first stitch on the back needle. 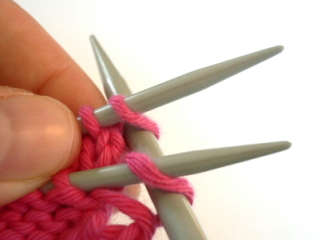 Wrap as for a knit stitch and draw the working yarn through both stitches to make one stitch which is now on the larger, right hand needle.* Repeat from * to * so that there are now two stitches on the right hand needle. 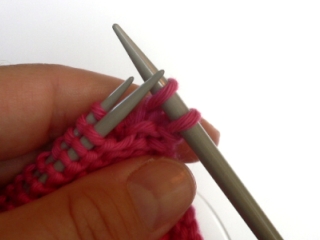 **Using the tip of one of the needles in your left hand (here shown using the needle closest to you) 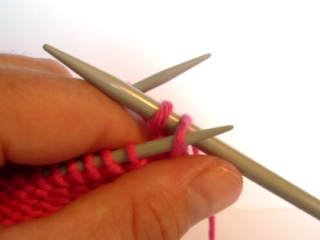 ...lift the first stitch worked over the second stitch worked...  ...just like regular binding off! ** Work one more stitch, then repeat from ** to **. On the inside of the work, the 3 needle bind off looks like this:  And thus can be used for a decorative chain on the outside of the work - just hold the WRONG sides together while working the bind off instead! Double crochet bind off
The double crochet bind off uses a crochet hook of approximately the same size as the knitting needles held in the right hand. Use the crochet hook to knit two stitches. 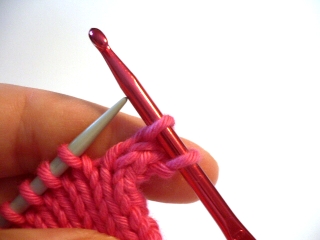 *Wrap the yarn once around the crochet hook... 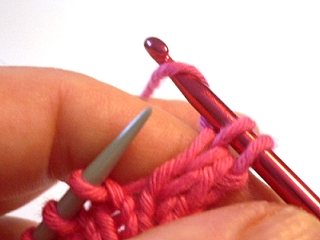 And pull it through both loops. 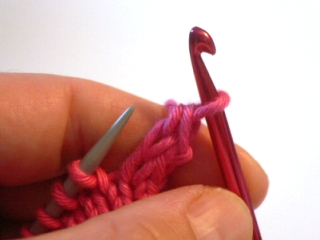 Knit one more stitch with the crochet hook* and repeat from * to *. The result is a decorative edging that looks like this: 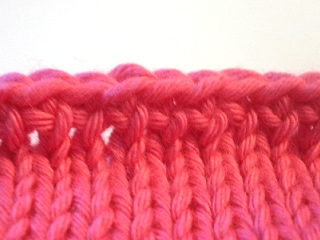 Picot bind off
The picot (a French word meaning "small points") bind off forms an ornamental edging that looks like this... 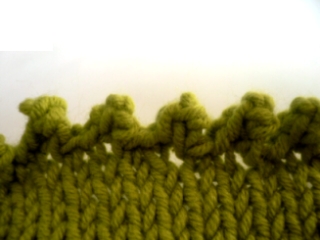 The points can be made larger or smaller, depending on the effect you want. The bind off makes a very flexible edging, as you are adding more stitches while making the picot points and thus the bind off row has more stitches than the knitting itself. To make a 2-stitch picot: *Cast on 2 stitches using the
 Then immediately bind off 4 stitches using the 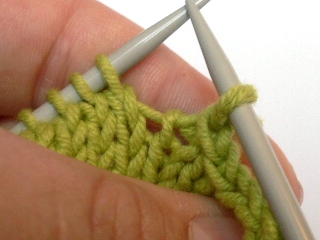 Slip the single stitch on the right hand needle back onto the left hand needle.* 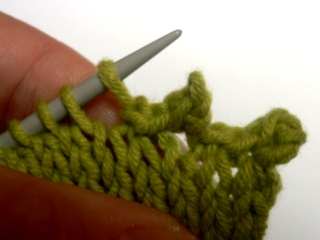 Repeat from * to * until end. The picot points can also be made with only one stitch (for a very subtle effect) or indeed with any number of stitches you choose. Just be sure to bind off at least twice the number of stitches that you cast on. And this is one bind off where it's okay to work rather tightly -- the picot points will be neater that way. A picot edging -- being very flexible -- is a good choice for baby things and the tops of toe-up socks. It can also lends a delicate decorative touch to blanket edges, wrist warmers and tops. I-cord bind off
I-cord, worked on the bind off row, makes a decorative edging that is firm and has a nicely finished appearance. Applied i-cord is lovely for neck or front edges where a simple, clean look is wanted rather than a garter stitch or ribbed edge. However, it can be a bit tricky to do well... if you've never made plain I-cord before, you might want to practice a bit at that first. Cast on 3 stitches, using the cable cast on.  *Knit 2 stitches, then 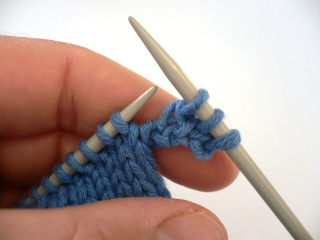 Slip the three worked stitches back onto the left hand needle. Then pull the working yarn tightly across the back of those 3 stitches* and repeat from * to *.  The result is a raised, I-cord edging running perpendicular to the body of knitting -- thus "applied I-cord". If you're going to be working this technique over a large area and it seems to be puckering the knitting below, try substituting a k3tog tbl (instead of k2tog tbl) every 3-4 rows of I-cord to help keep the knitting laying flat. 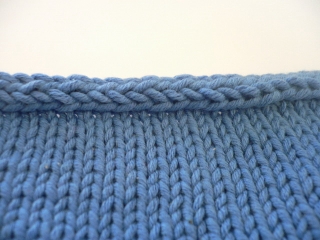
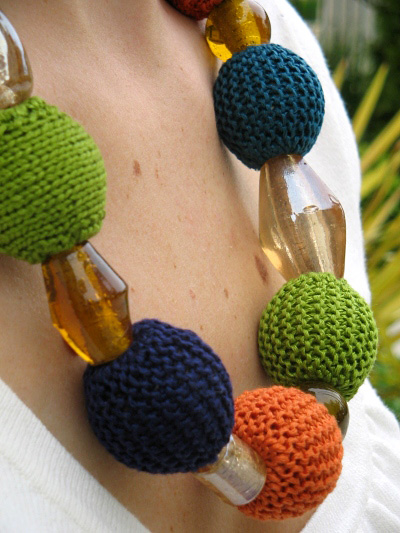
Necklace Length: 21 inches
Each Large Bead: 1 inch diameter | DMC Embroidery Floss [100% cotton; 8.7 yd/8m per skein]
 [A] 470; 2 skeins [A] 470; 2 skeins
[B] 823; 1 skein
[C] 921; 2 skeins
[D] 3808; 2 skeins
Note: Each bead uses one skein of embroidery floss.
1 set US #0/2 mm straight needles
4 floss bobbins
7 x 1-inch round wooden beads
Sewing needle
1 yd .375 inch wide ribbon (buy more ribbon if you would like a longer necklace)
6 large glass beads
Toggle clasp
2 large jump rings
Sewing thread in same color as ribbon
Needle-nose pliers |
| | 44 sts/50 rows = 4 inches in stockinette stitch | The Knitty Standard Book of British Birds
| alt | alternate |
| approx | approximately |
| beg | begin[ning] |
| BO | bind off [cast off] |
| cab | cable |
| CC | contrasting color |
| cn | cable needle |
| CO | cast on |
| cont | continue[ing] |
| dec | decrease[ing] |
| dpn | double pointed needles[s] |
| foll | follow[s][ing] |
| g | grams |
| i-cord | When working I-cord, work is not turned. Instead of turning the work around to work back on the WS, slide all sts to the other end of the needle, switch the needle back to your left hand, bring the yarn around the back of the work, and start knitting the sts again. After the first 2 sts, give the yarn a sharp tug.
Repeat this row to form I-cord. After a few rows, the work will begin to form a tube. |
| inc | increase[ing] |
| incl | including |
| inst | instructions |
| k | knit |
| k tbl | knit through back of loop |
| k2tog | knit two together |
| kfb | knit into front and back of stitch |
| m | meter[s] |
| MB | make bobble |
| MC | main color |
| m1 | Make 1 stitch: Insert left needle, from front to back, under
strand of yarn which runs between last stitch on left needle and
first stitch on right needle; knit this stitch through back loop.
1 stitch increased. |
| mm | millimeters |
| mult | multiple |
| opp | opposite |
| oz | ounces |
| p | purl |
| p2tog | purl two together |
| patt[s] | pattern[s] |
| pfb | purl into front and back of stitch |
| pm | place marker |
| psso | pass slipped stitch[es] over |
| rem | remaining |
| rep | repeat |
| rev St st | reverse stockinette stitch |
| RS | right side[s] |
| rnd[s] | round[s] |
| sc | single crochet |
| SSK | slip 2 stitches as if to knit, then knit those 2 stitches together |
| SSP | slip 2 stitches as if to purl, then purl those 2 stitches together |
| sl | slip |
| slp | slip one as if to purl |
| sl st | slip stitch |
| st[s] | stitch[es] |
| St st | stockinette stitch |
| tbl | through back of loop[s] |
| tog | together |
| WS | wrong side[s] |
| w&t | Wrap and turn. Bring yarn to front of work between needles, slip next st to right-hand needle, bring yarn around this st to back of work, slip st back to left-hand needle, turn work to begin working back in the other direction. |
| YO | yarn over |
| * * | repeat directions between ** as many times as indicated |
| Garter stitch is more elastic than stockinette stitch. For this reason, more stitches are cast on and more rows are worked for the stockinette stitch bead, than for the garter stitch bead. Before working each bead, wind the skein of floss you will use onto a bobbin. This will help prevent your floss from becoming twisted. |
|   Garter Stitch Bead [Make one each in A, B, C and D]: Garter Stitch Bead [Make one each in A, B, C and D]:
CO 12 sts. K 1 row. Next Row: BO 1, k to last st, kfb. Repeat this row until work measures 2.75 inches. BO all sts. Break floss, leaving a long (10-12 inch) tail for seaming. Stockinette St Bead [Make one each in A, C and D]: CO 13 sts. K 1 row. Row 1: BO 1, p to last st, kfb. Row 2: BO 1, k to last st, kfb. Repeat these 2 rows until work measures 3 inches. BO all sts. Break floss, leaving a long (10-12 inch) tail for seaming. |
| 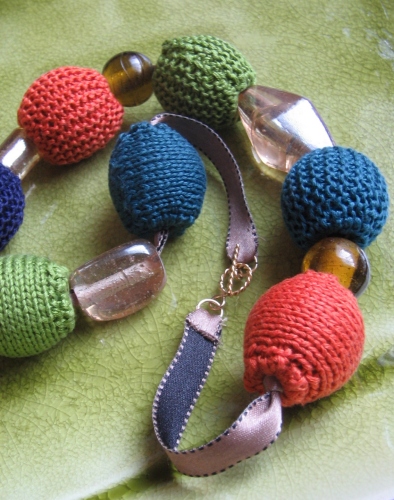 With wrong sides together, sew CO and BO edges together. Turn work right side out. With wrong sides together, sew CO and BO edges together. Turn work right side out.
Thread floss through the ridges created by binding off and increasing. Pull tight so that the size of the hole created is the same as the size of the hole in the bead. Sew to secure. Place bead inside work, so that the hole of the bead lines up with the hole at the bottom of the knitted piece. Finish remaining opening of knitted piece in the same manner, and sew in ends. Use pliers to attach a jump ring to each end of toggle clasp. Determine arrangement of beads and string onto ribbon. Center beads on ribbon so that the tails at each end are of equal length. Tie a knot at each end, close to end beads. Cut ribbon to 1 inch longer than desired finished length. Thread each ribbon end through a jump ring. Fold each over twice, so that no raw edge is showing (see photo). Sew ribbon ends in place. |
|
| Women's Medium | | Leg measures 5.5 inches from top edge to ankle | Lorna's Laces Shepherd Sock [80% superwash wool / 20% Nylon; 215yd/197m per 50g skein]; Color: Mineshaft; 2 skeins
Note: Subtle handpainted or solid-colored yarns do well in this design, but self-patterning yarns do not. 2 US #1/2.25 mm circular needles, 24 inches or longer
360 size 8/0 seed beads (180 beads for each sock)
Sample socks used galvanized platinum gold 8/0 beads from Earth Faire (www.earthfaire.com)
Dental floss threader or big-eye beading needle
Safety pin or split ring marker
Cable needle
Tapestry needle |
| | 36 sts / 46 rows = 4 inches in stockinette st, worked in the round |
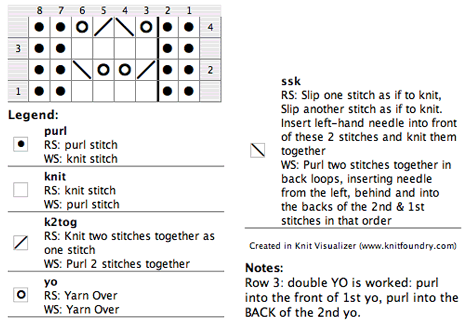
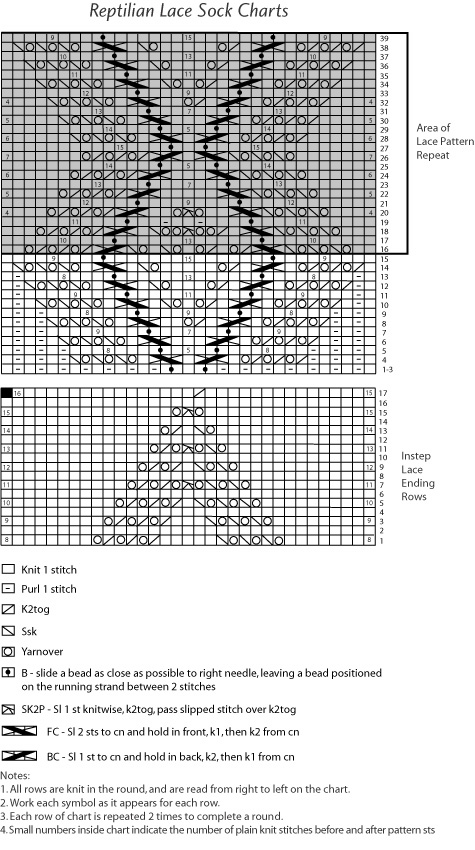
| The beading technique used for this project is easy - just slide bead close to right needle, and continue working. The bead will rest between stitches. When working cable crossing rows, it helps to transfer stitches being held on cable needle back to left needle before working them, as opposed to working them directly from the cable needle. This does add an extra step, but in this case because of the beads that lie between the cable stitches, it greatly decreases the risk of dropping a stitch. Really. The pattern is presented both in written and charted form. An instructional video for working small-circumference pieces on two circular needles can be found Abbreviations
B: Slide a bead as close as possible to right needle, leaving a bead positioned on the running strand between 2 stitches C3B: Slip next st to cable needle and hold to back of work, k2, slip st from cable needle back to left needle, k1 C3F: Slip next 2 sts to cable needle and hold to front of work, k1, slip sts from cable needle back to left needle, k2 2yo: Yarn over twice SK2P: Slip next st to right needle as if to knit, k2tog, pass slipped stitch over (k2tog). | 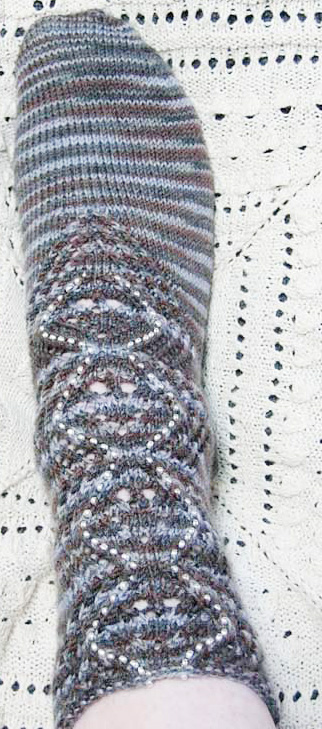 Sock [make 2] Sock [make 2]
Thread 180 size 8/0 seed beads onto yarn with dental floss threader or big-eye beading needle. CO 66 sts onto one circular needle and distribute them so that 33 sts are on each of 2 circular needles. Join to begin working in the round, being careful not to twist. Place safety pin or split ring marker in work after first round, to indicate beginning of round; move this marker up as work progresses.
Work Rounds 1-39 of large chart above (or written directions below).
Proceed to * . Rounds 1-3: [(K1, p1) 7 times, k1, B, k3, B, k1, (p1, k1) 7 times] twice. Round 4: [(K1, p1) 3 times, (k2tog, yo) 3 times, k1, C3B, k1, C3F, k1, (yo, ssk) 3 times, (p1, k1) 3 times] twice. Round 5: [(K1, p1) 3 times, k8, B, k5, B, k8, (p1, k1) 3 times] twice. Round 6: [(K1, p1) twice, k1, (k2tog, yo) 3 times, k1, C3B, k3, C3F, k1, (yo, ssk) 3 times, k1, (p1, k1) twice] twice. Round 7: [(K1, p1) twice, k9, B, k7, B, k9, (p1, k1) twice] twice. Round 8: [(K1, p1) twice, (k2tog, yo) 3 times, k1, C3B, k1, k2tog, yo, k2, C3F, k1, (yo, ssk) 3 times, (p1, k1) twice] twice. Round 9: [(K1, p1) twice, k8, B, k9, B, k8, (p1, k1) twice] twice. Round 10: [K1, p1, k1, (k2tog, yo) 3 times, k1, C3B, k1, k2tog, yo, k1, yo, ssk, k1, C3F, k1, (yo, ssk) 3 times, k1, p1, k1] twice. Round 11: [K1, p1, k9, B, k11, B, k9, p1, k1] twice. Round 12: [K1, p1, (k2tog, yo) 3 times, k1, C3B, k1, k2tog, yo, k3, yo, ssk, k1, C3F, k1, (yo, ssk) 3 times, p1, k1] twice. Round 13: [K1, p1, k8, B, k13, B, k8, p1, k1] twice. Round 14: [K1, (k2tog, yo) 3 times, k1, C3B, k1, k2tog, yo, k5, yo, ssk, k1, C3F, k1, (yo, ssk) 3 times, k1] twice. Round 15: [K9, B, k15, B, k9] twice. Pattern Repeat Rounds:
Round 16: K2, (yo, ssk) 3 times, C3F, (k2tog, yo, k1) twice, yo, ssk, k1, yo, ssk, C3B, (k2tog, yo) 3 times, k2] twice. Round 17: [K10, B, k13, B, k10] twice. Round 18: [K3, (yo, ssk) 3 times, C3F, k1, k2tog, 2yo, SK2P, 2yo, ssk, k1, C3B, (yo, k2tog) 3 times, k3] twice.
Round 19: [K11, B, k3, (k1, p1) in (2yo) from previous round, k1, (k1, p1) in (2yo) from previous round, k3, B, k11] twice.
Round 20: [K4, (yo, ssk) 3 times, C3F, k2, yo, SK2P, yo, k2, C3B, (yo, k2tog) 3 times, k4] twice.
Round 21: [K12, B, k9, B, k12] twice.
Round 22: [K5, (yo, ssk) 3 times, C3F, k5, C3B, (yo, k2tog) 3 times, k5] twice.
Round 23: [K13, B, k7, B, k13] twice.
Round 24: [K6, (yo, ssk) 3 times, C3F, k3, C3B, (yo, k2tog) 3 times, k6] twice.
Round 25: [K14, B, k5, B, k14] twice.
Round 26: [K7, (yo, ssk) 3 times, C3F, k1, C3B, (yo, k2tog) 3 times, k7] twice.
Round 27: [K15, B, k3, B, k15] twice.
Round 28: [K6, (k2tog, yo) 3 times, k1, C3B, k1, C3F, k1, (yo, ssk) 3 times, k6] twice.
Round 29: [k14, B, k5, B, k14] twice.
Round 30: [K5, (k2tog, yo) 3 times, k1, C3B, k3, C3F, k1, (yo, ssk) 3 times, k5] twice.
Round 31: [K13, B, k7, B, k13] twice.
Round 32: [K4, (k2tog, yo) 3 times, k1, C3B, k1, k2tog, yo, k2, C3F, k1, (yo, ssk) 3 times, k4] twice.
Round 33: [K12, B, k9, B, k12] twice.
Round 34: [K3, (k2tog, yo) 3 times, k1, C3B, k1, k2tog, yo, k1, yo, ssk, k1, C3F, k1, (yo, ssk) 3 times, k3] twice.
Round 35: [K11, B, k11, B, k11] twice.
Round 36: [K2, (k2tog, yo) 3 times, k1, C3B, k1, k2tog, yo, k3, yo, ssk, k1, C3F, k1, (yo, ssk) 3 times, k2] twice.
Round 37: [K10, B, k13, B, k10] twice.
Round 38: [K1, (k2tog, yo) 3 times, k1, C3B, k1, k2tog, yo, k5, yo, ssk, k1, C3F, k1, (yo, ssk) 3 times, k1] twice.
Round 39: [K9, B, k15, B, k9] twice.
* Repeat Rounds 16-39 once more. Repeat Rounds 16-27 once. Heel Flap:
Work Heel Flap back and forth over next 33 sts only.
Row 1 [RS]: [Sl 1, k1] to last 3 sts, sl 1, k2tog. 32 sts.
Row 2 [WS]: Sl 1, p to end.
Row 3 [RS]: [Sl 1, k1] to end.
Repeat Rows 2 and 3 14 times more, then work Row 2 once more. Turn Heel:
Row 1 [RS]: K18, ssk, k1. Turn work.
Row 2 [WS]: Sl 1, p5, p2tog, p1. Turn work.
Row 3 [RS]: Sl 1, k6, ssk, k1. Turn work.
Row 4 [WS]: Sl 1, p7, p2tog, p1. Turn work.
Row 5 [RS]: Sl 1, k8, ssk, k1. Turn work.
Row 6 [WS]: Sl 1, p9, p2tog, p1. Turn work.
Row 7 [RS]: Sl 1, k10, ssk, k1. Turn work.
Row 8 [WS]: Sl 1, p11, p2tog, p1. Turn work.
Row 9 [RS]: Sl 1, k12, ssk, k1. Turn work.
Row 10 [WS]: Sl 1, p13, p2tog, p1. Turn work.
Row 11 [RS]: Sl 1, k14, ssk, k1. Turn work.
Row 12 [WS]: Sl 1, p15, p2tog, p1. Turn work.
Row 13 [RS]: Sl 1, k16, ssk. Turn work.
Row 14 [WS]: Sl 1, p16, p2tog. Turn work. 18 sts remain. K all sts; with same needle, pick up and k 16 sts along edge of heel flap (1 st in each slipped st along edge), pick up and k 1 st in space between heel flap and sts on next needle. With other needle, work sts on top of foot as follows:
[K6, (k2tog, yo) 3 times, k1, C3B, k1, C3F, k1, (yo, ssk) 3 times, k6] (Round 28 of lace chart) With Needle 1, pick up and k 1 st in space between these sts and top of heel flap, pick up and k 16 sts along remaining edge of heel flap k to the end of this needle. 33 sts on top needle (Needle 1), 52 sts on lower needle (Needle 2). Gusset
Note: Directions for lace pattern and gusset shaping are worked at the same time. Read ahead before proceeding. Gusset Shaping
Round 1: Work next round of lace pattern over sts on Needle 1 only; k1, ssk, k to last 3 sts on Needle 2, k2tog, k1. 2 sts decreased.
Round 2: Work next round of lace pattern over sts on Needle 1 only; k all sts on Needle 2.
Repeat these 2 rounds 9 times more. 32 sts remain on Needle 2.
AT THE SAME TIME work lace pattern as follows:
Continue working lace pattern over sts on Needle 1 only, working to Round 39, then repeating Rounds 16-27. Work Rounds 1-16 of Instep Lace Ending Rows chart over sts on Needle 1 only (written directions follow), k all sts on Needle 2. 32 sts remain. Proceed to **. Round 1: K8, [yo, ssk] 3 times, k5, [k2tog, yo] 3 times, k8.
Even-numbered Rounds 2-14: K all sts.
Round 3: K9, [yo, ssk] 3 times, k3, [k2tog, yo] 3 times, k9.
Round 5: K10, [yo, ssk] 3 times, k1, [k2tog, yo] 3 times, k10.
Round 7: K11, [yo, ssk] twice, yo, SK2P, yo, [k2tog, yo] twice, k11.
Round 9: K12, [yo, ssk] twice, k1, [k2tog, yo] twice, k12.
Round 11: K13, yo, ssk, yo, SK2P, yo, k2tog, yo, k13.
Round 13: K14, yo, ssk, k1, k2tog, yo, k14.
Round 15: K15, yo, SK2P, yo, k15.
Round 16: K16, k2tog, k15. 32 sts remain on Needle 1. ** Work in stockinette st until work measures 1.5 inches less than desired length to end of toe. Toe
Round 1: [K1, k2tog, k to last 3 sts on needle, ssk, k1] twice. 4 sts decreased.
Round 2: K all sts.
Repeat these 2 rounds 8 times more. 28 sts remain (14 sts on each needle). |
| | Here is a trick that helps avoid those pesky little "dog ears" at the corners of your toe openings: pass the last stitch over the next to last stitch, at both sides of the front and back stitches. You now have 2 fewer stitches on each needle. Cut your yarn, leaving 10-12 inches of tail with which to close the toe. To Graft or Not to Graft
I like to graft my toes closed because it is a seamless, invisible closure. If grafting daunts you, however, turn your sock inside out and work a Three-Needle Bind Off.
Weave in your yarn ends securely. |
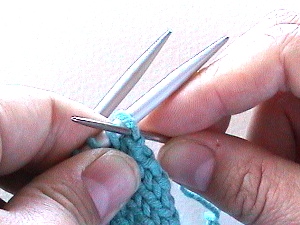
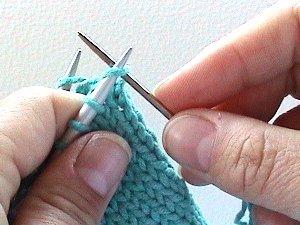
 | | By Theresa Vinson Stenersen | In the last issue, I promised to show you how to join two sets of live stitches without leaving a seam. Perfect for this particular issue of Knitty with its focus on garments to be worn ... hmm ... well, let's just say places you might not want a seam. It's also perfect for the toes of socks, the top of hoods and baby garments or anywhere else you don't want the thickness of bound-off edges sewn together. It's not, however, particularly well suited to shoulder seams on heavy sweaters or other places where you might want the stability of a bound-off edge to hold the shape of the garment. Grafting, also known as Kitchener stitch or weaving, joins two sets of stitches that are still on the needle (a.k.a. "live") by using a tapestry needle threaded with yarn to create a row that looks like knit stitches between them. I still find it a rather magical and mysterious process, even though I've gained some understanding of what's happening as I graft. If you haven't grafted before and have been feeling intimidated by the mere idea, all I can ask is that you take a leap of faith and give it a try. But it may be a smart idea to make a couple of small swatches in a nice plain sturdy yarn -- one that isn't slippery, lumpy or otherwise difficult to work with -- and follow these instructions a few times before trying it out on something you've spent days knitting. And you'll want to do this the first few times someplace quiet without the least possibility of interruption. If your attention gets pulled away from the process, it's not terribly easy to figure out where you left off. [I still have to be careful to finish one complete series of steps before stopping so that I can be certain of starting again at the proper point.] But before we get to step one there are a few preparations that have to be made. Before you can start grafting you must divide the stitches evenly onto two needles -- these can be straight, circular or double-pointed needles -- it's all the same, but if you're just learning you might want to start with straight needles so there's less chance of the stitches slithering around and confusing you. It is vital that you have the exact same number of stitches on the two needles. If you have 10 stitches on the first needle you have to have 10 stitches on the other. No way around this. Count the stitches at least twice to be absolutely positive. And while we're on the subject, I'll admit that I obsessively count the number of stitches remaining from time to time while in the process of grafting to be sure I'm not going to wind up with an extra stitch at the end of one of the needles -- also a good way to be sure you're doing it right. The number of stitches must be equal because there's simply nothing to do with any leftover stitches and they'll just be left hanging there to unravel, poor things. There's many a thing in knitting that can be fudged, but this isn't one of them. A quick note: For this tutorial, I'm going to focus on grafting stockinette stitch together, with a note about grafting garter stitch at the end. Grafting more complicated stitch patterns are, to tell the truth, beyond my current scope of practice. Okay. Sit down someplace quiet with a good light source, your knitting and a tapestry needle. You can thread the tapestry needle with a length of yarn that's not attached to the knitting and weave it in later, but ideally you will have left a tail on one of the pieces of knitting that's at least twice as long as the finished join will be. From experience, I've found that the results are best if the tail is coming from the piece on the needle furthest from me when I start. Hold the needles parallel with the tips pointing in the same direction and the wrong (purl) sides facing inwards.
Now you'll need to "set up" for grafting by performing the following two steps one time: Insert the threaded tapestry needle into the first stitch on the needle closest to you as if to purl and pull it through, leaving the stitch on the needle.
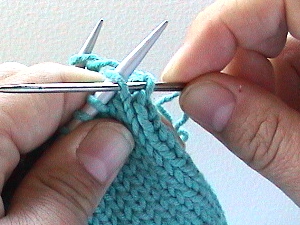
Then insert the needle into the first stitch on the back needle as if to knit, leaving the stitch on the needle. Pull the yarn through.
These first two steps are preparatory and are only done once.
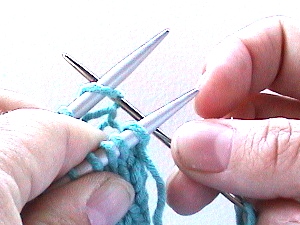
Now let's get down to some serious kitchenering -- the following four steps are the ones you will repeat until you've worked every stitch on the needles. I usually chant to myself "knit, purl -- purl, knit" while grafting and you'll soon see why.
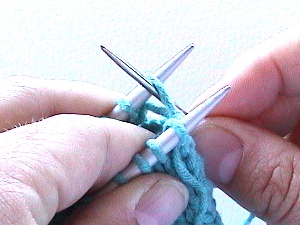
Insert the needle into the first stitch on the front needle as if to knit, while slipping it off the end of the needle.
Insert the needle into the next stitch on the front needle as if to purl, but this time, leave it on the needle. Gently pull the yarn through.
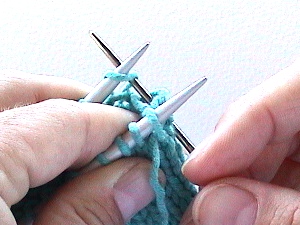
Insert the needle into the first stitch on the back needle as if to purl, and slip it off the end of the needle.
Insert the needle into the next stitch on the back needle as if to knit, and leave it on the needle. Pull the yarn through.
Repeat steps 1-4 over and over again. After you've worked a couple of inches, pause [being sure to complete step 4 so you'll know where to begin again] and tighten up the stitches using the end of the tapestry needle to tug at each loose loop in turn, working from the beginning of the join towards the last stitches worked. I find I get a nicer final result when I pull the yarn lightly through the stitches during the process of grafting and then adjust the tension on the yarn to match the gauge of the knitting as closely as possible afterwards.
So this... Keep repeating steps 1-4, pausing to tighten up the stitches now and then until all the stitches are worked. The last two stitches remaining on the needle will require you to perform step 1 then go directly to step 3.
Now a brief word about grafting garter stitch: In order to create an invisible join on garter stitch, you'll have to be sure that the last row of stitches on the front piece have purl bumps snug up against the needle and the last row of stitches on the back piece have knit stitches up against the needle. For the preparatory steps, insert the needle into the first stitch on the front needle as if to purl and then into the first stitch on the back needle as if to purl again. Then, instead of working steps 1-4, simply repeat steps 1 and 2 with first the front needle and then the back needle. The chant in this case will be "knit, purl --knit, purl". Remember to take deep breaths and keep chanting and soon you'll be able to graft without even referring to the instructions. Honest! |
SOURCE:KNITTY.COM
|


No comments:
Post a Comment